Redis is well known as an in-memory database that’s designed for various use cases, including session management, caching, high speed transactions, pub/sub, data streaming, analytics, and more. Redis is also popular for its support of client libraries and its wide-ranging list of programming languages. You can develop apps with most popular programming languages and connect them to your Redis database with zero hassle.
Another reason Redis is versatile is its extensibility as a multi-model database. For example, you can import a RediSearch module into Redis and get an extremely fast, in-memory, search engine. Similarly, you can also use Redis as a graph database, with the help of the RedisGraph module.
All of this, of course, begs the question: Can you use Redis as a relational database? The answer is simple: An ODBC connector to Redis can power numerous applications, such as Tableau, DataBind Charts, Crystal Reports, LINQPad, Entity Framework 6, etc.; with the ODBC driver, you can obtain an SQL-like access to Redis, so you can even connect the ubiquitous Microsoft Excel to Redis data.
The good news is, Redis’ partner — CData Software — has developed an ODBC driver for Redis, making Redis even more accessible.
With the CData ODBC Driver for Redis, users can connect to data sources from various BI, analytics and reporting tools, but stored in Redis. In order to configure the driver for Windows, download the appropriate ODBC driver from the options listed here and follow the simple steps listed below.

Before the driver is able to help you connect to Redis and Redis Enterprise instances, you must read through and agree to the end user license agreement. After you click “I agree,” you will be able to begin the installation process.
After you have accepted the EULA, you will encounter several screens prompting you to select an installation destination as well as the components you want to install.
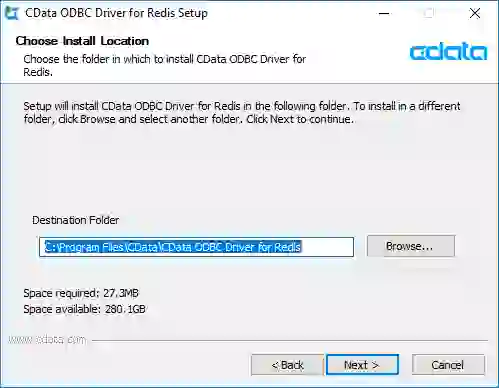
The destination folder for the installation should be pre-populated, so as long as you have enough space available, you will be able to proceed by clicking “next.”

The subsequent screen will allow you to select which components you would like to install. Here, it is important to note that the bitness — whether 32-bit or 64-bit — of your ODBC Driver does not refer to bitness of your machine. Instead, it refers to the bitness of the applications you will use with the driver. According to Johnson, it makes sense for most users to install both versions of the driver.
On this same screen, you will also notice that there are help files included, which provide more details about the driver’s features and how they are meant to be used. There are some demo applications as well, which provide simple, straightforward examples of what using the driver can look like. Then, there is the final component — the SQLBroker, a lightweight application that allows you to connect to your Redis data remotely using Tabular Data Stream or MySQL protocol. After you have selected these components, click “next” to continue.
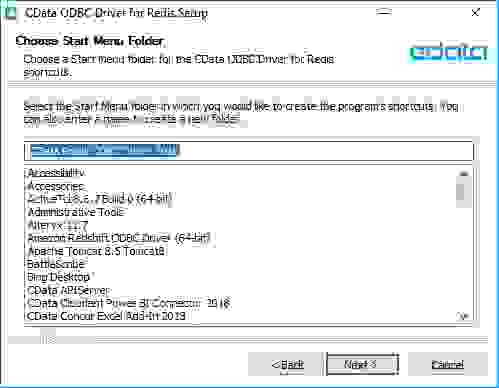
On the following screen, you will be prompted to select the start menu folder for the driver’s shortcuts, and to enter a name for this new folder. Then, click “next” again, and you should see a screen letting you know that the driver is ready to install. Click “install” to continue, and you will observe all of the components you previously selected being installed. Once the installation is complete, you should see an option to configure an ODBC data source for the driver, which can be used to connect to Redis data from any number of other applications. Click “finish” to open the data source configuration wizard.

Once you open the wizard, you will see a new screen listing the connection properties used to connect to your Redis instance:
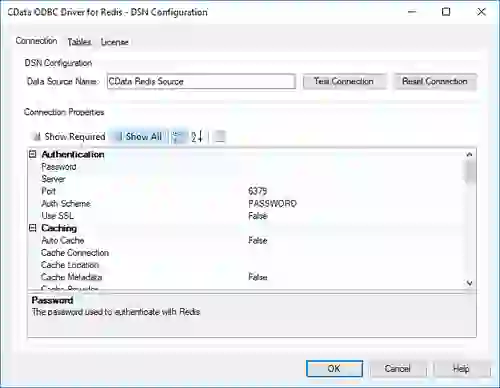
Now, you should start by entering the IP address or fully qualified domain name for the Redis server. Then, enter the port for your Redis instance. If your Redis instance is protected by a password, you can indicate that under “Auth Scheme.” If it isn’t, you can simply set the Auth Scheme to “none.”
Once you have made these basic customizations, you can go on to explore the other connection properties. For example, take a look at the Define Tables property:

This property enables you to group keys based on a key pattern; these groups will then be treated as a table. In other words, table patterns set up key patterns that will be used to define tables by discovery. For example, suppose you specify that Table_1 will include all of the keys that begin with prefix:, and that Table_2 will include all of the keys beginning with prefix:prefix2. If you set the Table Pattern property to prefix:*, then the ODBC driver will only highlight keys that begin with prefix:. If you use the default value instead, then the driver will expose all keys that use a colon to separate hierarchies.
There are also numerous other connection properties available, which will allow you to do anything from connecting through a proxy or firewall to configuring any logging and secure connectivity.
Now that you have indicated your installation and connection preferences, you are ready to test the driver’s functionality. At the top of the screen within the data source configuration wizard, click “test connection”:
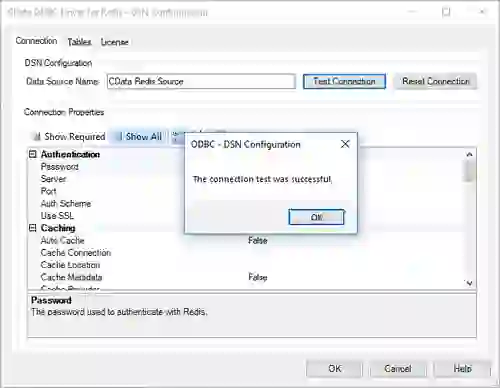
If the connection test is successful — which it should be if you have correctly followed the above steps — click “OK” to save your connection settings and close the wizard.
With the DSN configured, you are now ready to connect to your Redis data from any number of third-party BI, reporting, ETL and custom applications. If you have any questions, you can reach out to CData Software’s support team at support@cdata.com. Good luck with the installation process!