
What to Choose for Your Synchronous and Asynchronous Communication Needs—Redis Streams, Redis Pub/Sub, Kafka, etc.
Learn more


It is very common to get real-time notifications when navigating in a web application. Notifications could come from a chat bot, an alerting system, or be triggered by an event that the app pushes to one or more users. Whatever the source of the notifications, developers are increasingly using Redis to create notification services.
In modern applications powered by a microservices architecture, Redis is often used as a simple cache and as a primary database. But it is also used as a communication layer between services using a persistent messaging layer powered by Redis Streams, a lightweight eventing system using its well-known Pub/Sub (Publish/Subscribe) commands.
In this blog post, we’ll show you how easy it is to create a small notification service using Redis Pub/Sub to send messages to a web application, developed with Vue.js, Node.js, and WebSockets.
Prerequisites
This demo service uses:
If you do not have already a Redis instance running, you can start it using Docker; in a terminal, run this command:
> docker run -it --rm --name redis-server -p 6379:6379 redis
Redis should now be up and running and ready to accept connections.
To configure the project with the proper structure, open a terminal and enter the following commands:
> mkdir notifications

> cd notifications

> mkdir notif-server

> cd notif-server
Create a new Node.js project using npm (the -y parameter will set all values to the default one):
> npm init -y

> npm install ws redis
The final command above adds the WebSocket and Redis dependencies to your project. You are now ready to write some code!
Writing the WebSocket server
Open your favorite code editor for Node.js (I use Visual Studio Code) and simply enter the code “code .” to open the current directory. In your editor, create a new file called server.js.
const WebSocket = require('ws');
const redis = require('redis');

// Configuration: adapt to your environment
const REDIS_SERVER = "redis://localhost:6379";
const WEB_SOCKET_PORT = 3000;

// Connect to Redis and subscribe to "app:notifications" channel
var redisClient = redis.createClient(REDIS_SERVER);
redisClient.subscribe('app:notifications');

// Create & Start the WebSocket server
const server = new WebSocket.Server({ port : WEB_SOCKET_PORT });

// Register event for client connection
server.on('connection', function connection(ws) {

  // broadcast on web socket when receving a Redis PUB/SUB Event
  redisClient.on('message', function(channel, message){
    console.log(message);
    ws.send(message);
  })

});
This simple Node.js program is limited to the demonstration and focuses on:
Lines 5 and 6 are simply used to configure the Redis server location and the port to use for the Web Socket server. As you can see it is pretty simple.
Running the WebSocket server
If you have not yet installed nodemon, install it now. Then start the WebSocket server using the following command:
> nodemon server.js
Let’s now create the frontend that will receive the notifications and print them to the user.
Open a new terminal and run the following command from the notifications directory:
If you have not already installed the Vue CLI tool already, do so now using the command npm install -g @vue/cli.
> vue create webclient

> cd web-client
This command creates a new Vue project that is ready to be executed and extended.
One last package to install for this demonstration is BootstrapVue, which makes it easy to use the CSS library and components from the popular Bootstrap framework.
> npm install bootstrap-vue bootstrap
Open the web-client directory in your favorite code editor, then start the newly created Vue application:
> npm run serve
The last command starts the Vue development server that will serve the pages and also automatically reloads the pages when you change them.
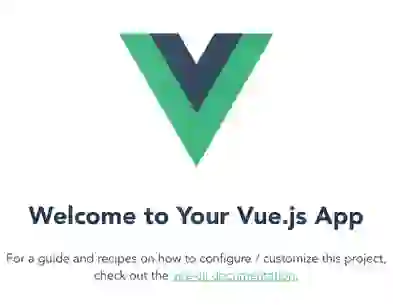
Open your browser, and go to http://localhost:8080; where you should see the default Vue welcome page:
Adding WebSocket to the frontend
The Vue framework is quite simple, and for this post we will keep the code as simple as possible. So let’s quickly look at the directory structure:
├── README.md
├── babel.config.js
├── node_modules
├── package-lock.json
├── package.json
├── public
│   ├── favicon.ico
│   └── index.html
└── src
    ├── App.vue
    ├── assets
    │   └── logo.png
    ├── components
    │   └── HelloWorld.vue
    └── main.js
The files at the root level (babel.config.js, package.json, package-lock.json, node_modules) are used to configure the project. The most interesting part, at least for now, is located in the src directory:
The public/index.html is the static entry point from where the DOM will be loaded. If you look at it you will see a <div id=”app”>, which is used to load the Vue application.
This demonstration is quite simple, and you will have to modify only two files: the App.vue and main.js files. In a real-life application, you would probably create a Vue.js component that would be reused in various places.
Updating the App.vue file to show WebSocket messages
Open the App.vue file in your editor and add the information listed below. At the bottom of the page, just before the </div> tag, add the following HTML block:
<hr/>
<h3>
  {{message}}
</h3>
<hr/>
Using {{message}} notation, you are indicating to Vue to print the content of the message variable, which you will define in the next block.
In the <script>, replace the content with:
<script>
import HelloWorld from './components/HelloWorld.vue'

export default {
  name: 'App',
  data() {
    return {
      message: "",
    }
  },
  created(){
    try {
      const ws = new WebSocket("ws://localhost:3000/");
      ws.onmessage = ({data}) => {
        this.message =  data;
        console.log(this.message);
      }
    } catch(err) {
      console.log(err);
    }
  },
  components: {
    HelloWorld
  }
}
</script>
These few lines of code are used to:
If you look carefully at what has been changed, you can see that you have added:
Sending messages from Redis to your Vue application
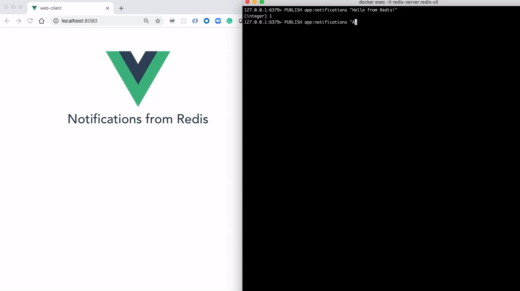
The WebSocket server and the Vue frontend should now be running and connected thanks to the few lines of JavaScript you added. It’s time to test it!
Using the Redis CLI or RedisInsight, publish some messages to the app:notifications channel. For example, if you started Redis using Docker, you can connect to it using the following command and start publishing messages:
> docker exec -it redis-server redis-cli

127.0.0.1:6379> PUBLISH app:notifications  "message from Redis2"
You should see the message appear at the bottom of the application in your browser:
As you can see, it is pretty easy to push content to your web frontend in real time using WebSocket. So now lets improve the design and add a more user-friendly interface using Bootstrap.
Creating an alert block with Bootstrap
In this section, we’ll show you how to use a Bootstrap alert component, which appears when a new message is received and disappears automatically after a few seconds, using a simple countdown.
Main.js file
Open the main.js file and add the following lines after the last import:
import { BootstrapVue } from 'bootstrap-vue';
import 'bootstrap/dist/css/bootstrap.css';
import 'bootstrap-vue/dist/bootstrap-vue.css';

Vue.use(BootstrapVue);
These four lines import and register the Bootstrap components in your Vue application.
App.js file
In the App.vue file, replace the code you added earlier (everything between the two <hr/> tags and the tags themselves) with the following:
<div class="d-inline-flex p-4">
   <b-alert id="notification"
      :show="dismissCountDown"
      dismissible
      @dismissed="dismissCountDown=0"
      @dismiss-count-down="countDownChanged"
    >
    New notification: {{message}}
   </b-alert>
</div>
This component uses several attributes:
Let’s add a few lines of JavaScript to define the variables and methods used by the alert component:
data() {
    return {
      message: "",
      dismissSecs: 5,
      dismissCountDown: 0,
    }
  },
  created(){
    try {
      const ws = new WebSocket("ws://localhost:3000/");
      ws.onmessage = ({data}) => {
        this.message =  data;
        this.showAlert();
      }
    } catch(err) {
      console.log(err);
    }
  },
  methods: {
    countDownChanged(dismissCountDown) {
      this.dismissCountDown = dismissCountDown
    },
    showAlert() {
      this.dismissCountDown = this.dismissSecs
    }
  },

...
In this section you have:
Let’s try it!
Go back to redis-cli or Redis Insight and post new messages to the app:notifications channel.
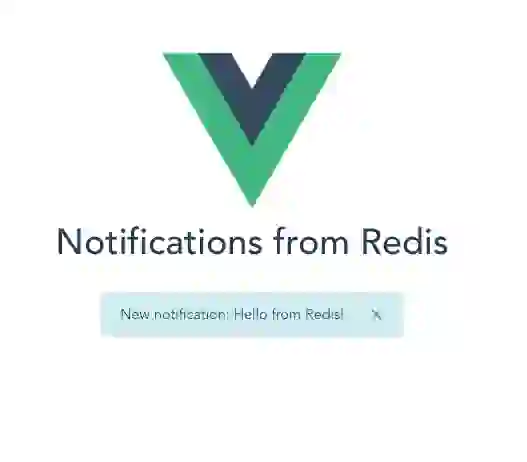
As you can see, it is easy to use Redis to create a powerful notification service for your application. This sample is pretty basic, using a single channel and server and broadcasting to all the clients.
The goal was really to provide an easy way to start with WebSocket and Redis Pub/Sub to push messages from Redis to a web application. There are many options to deliver messages to specific clients using various channels, and to scale and secure the application.
You can also use the WebSocket server in the other direction, to consume messages as well as to push messages to clients. But that’s a big topic for another blog post. In fact, stay tuned for more blog posts on how you can use Redis Gears to easily capture events directly in the Redis database and push some events to various clients.
For more information, see these resources: